When you want register the data of people who have applied for jobs in your company, You can register using Applicant On the recruitment menu. And if you want accommodate applicant data the, You can do download use Applicant Selection On the recruitment menu.
In this section, You can learn :
1. How to make Applicants.
2. How to make Applicant Selection.
1. How to Making Applicants.
- On the Menu Recruitment → Select Applicant.
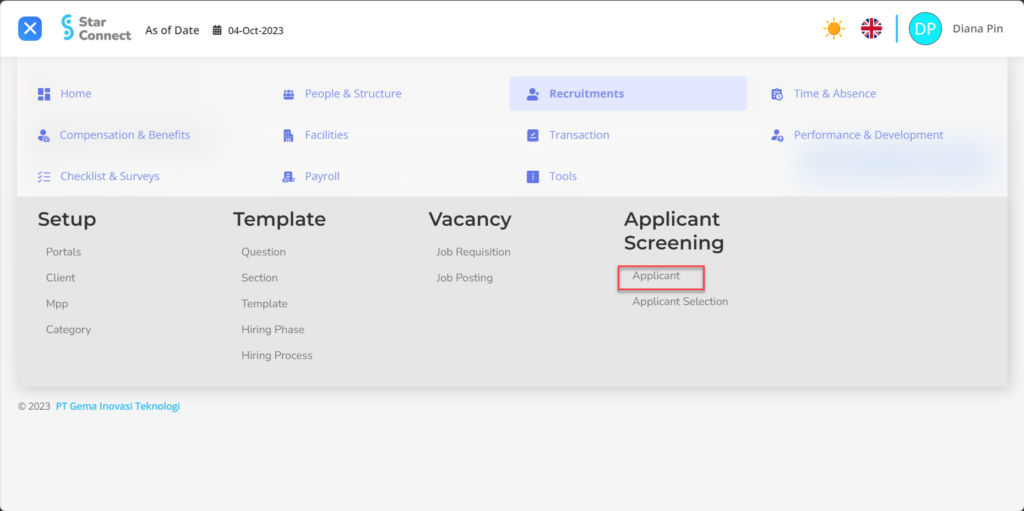
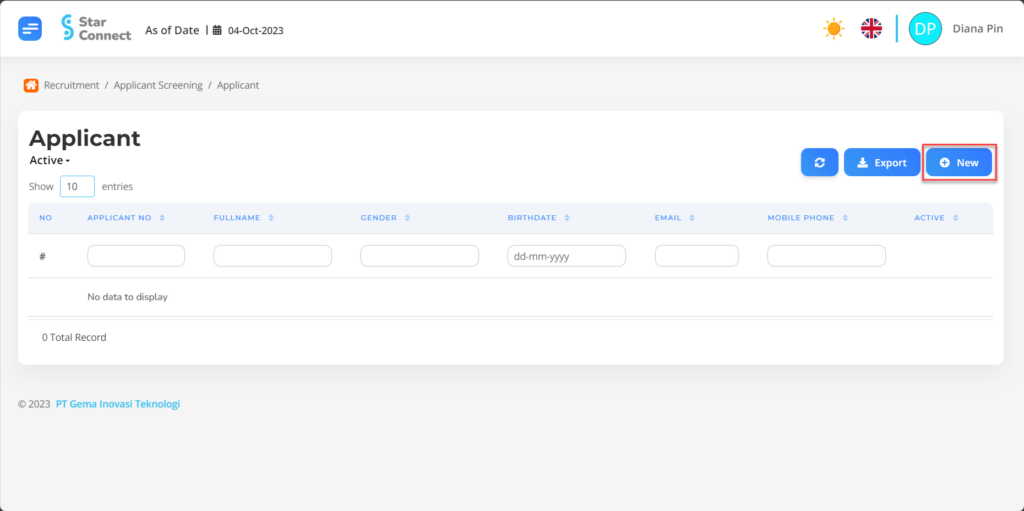
- Click the button New to create an Applicant.
- In part Biodata, isi with detailed biodata of the Applicant you want to create.
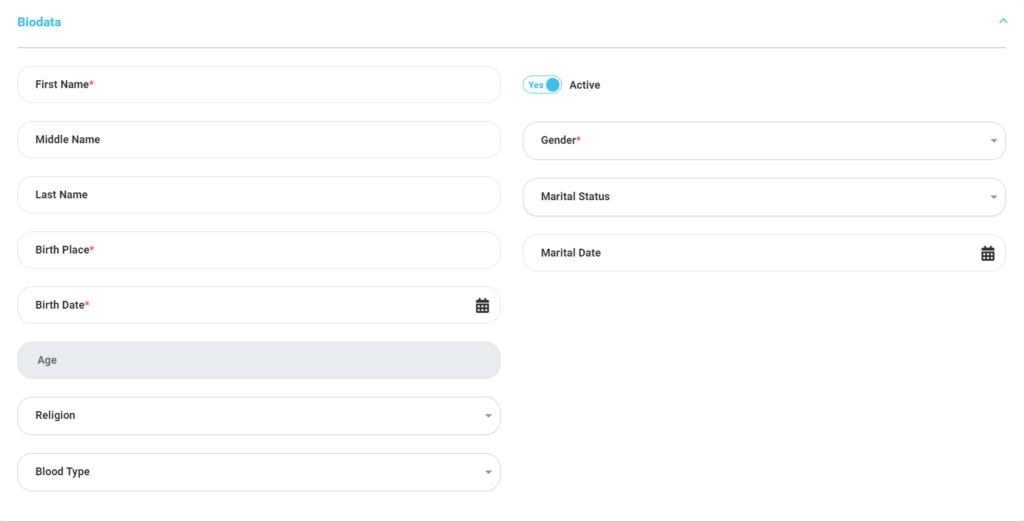
| No | Feature | Information |
| 1 | First name | Enter first name Applicant. |
| 2 | Middle Name | Enter middle name Applicant, when needed. |
| 3 | Last Name | Enter last name Applicant, when needed. |
| 4 | Birth Place | Enter place of birth Applicant. |
| 5 | Birth Date | Enter date of birth Applicant. |
| 6 | Age | It will automatically fill in after input birth date. |
| 7 | Religion | Enter religion Applicant, in the form of LOV. |
| 8 | Blood Type | Enter blood group Applicant, in the form of LOV. |
| 9 | Active | • Click Yes, if the Applicant is still active and processed in system. • Click No, if the Applicant has not active, then the Applicant name will be automatic lost in another menu. |
| 10 | Gender | Enter gender Applicant, in the form of LOV. |
| 11 | Marital Status | Enter status Applicant, in the form of LOV. |
| 12 | Marital Date | Enter date of marital status Applicant if married. |
- In part Contact Information, isi with the contact information of the Applicant you want to create.

| No | Feature | Information |
| 1 | Main Phone | Enter mobile phone number prospective employees. |
| 2 | Email Adress | Enter personal email prospective employees. |
| 3 | Other Phone | Enter home telephone number or Mobile phone other prospective employees, If there are. |
- In part Address Information, isi with Applicant address information.

| No | Feature | Information |
| 1 | Address | Filled with a complete address Applicant. |
| 2 | Province | Filled with province Applicant location, in the form of LOV. |
| 3 | City | Filled with kota Applicant location, in the form of LOV. |
| 4 | District | Filled with regency Applicant location, in the form of LOV. |
| 5 | Sub District | Filled with subdistrict Applicant location, in the form of LOV. |
| 6 | Postal Code | Filled with Postal code from the Applicant location. |
- In part Expected Salary, isi with Applicant salary information.

| No | Feature | Information |
| 1 | Expected Salary From | Filled minimum wage Which expected for Applicants. |
| 2 | Expected Salary To | Filled maximum salary Which expected for Applicants. |
- If you have entered all the Applicant information, then the final step is to do it save with a click button “Submit” at the very bottom of the Applicant page.
2. How to Make Applicant Selection.
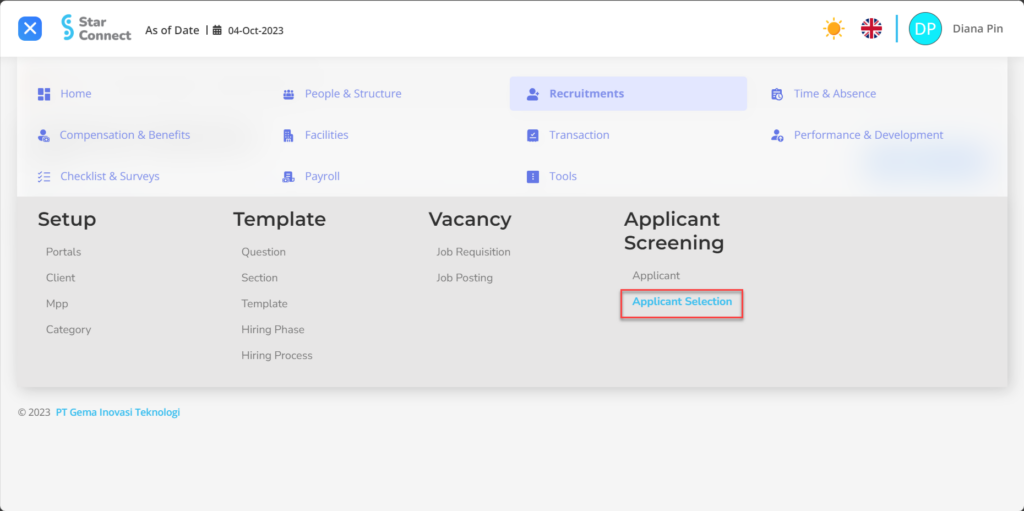
- On the Menu Recruitment → Select Applicant Selection.
- In part Applicant Selection, by clicking the button “data Job Posting”, the system will automatically process the Export List containing list applicants will be processed.
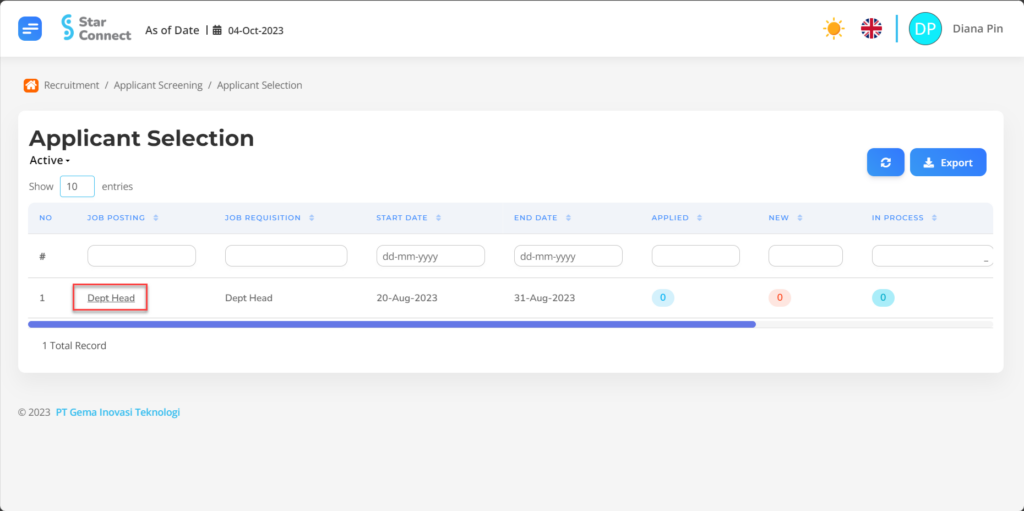
- If you want to accommodate/men-download Applicant results that have been made, You can go to the click section button “Download” on the export list page.
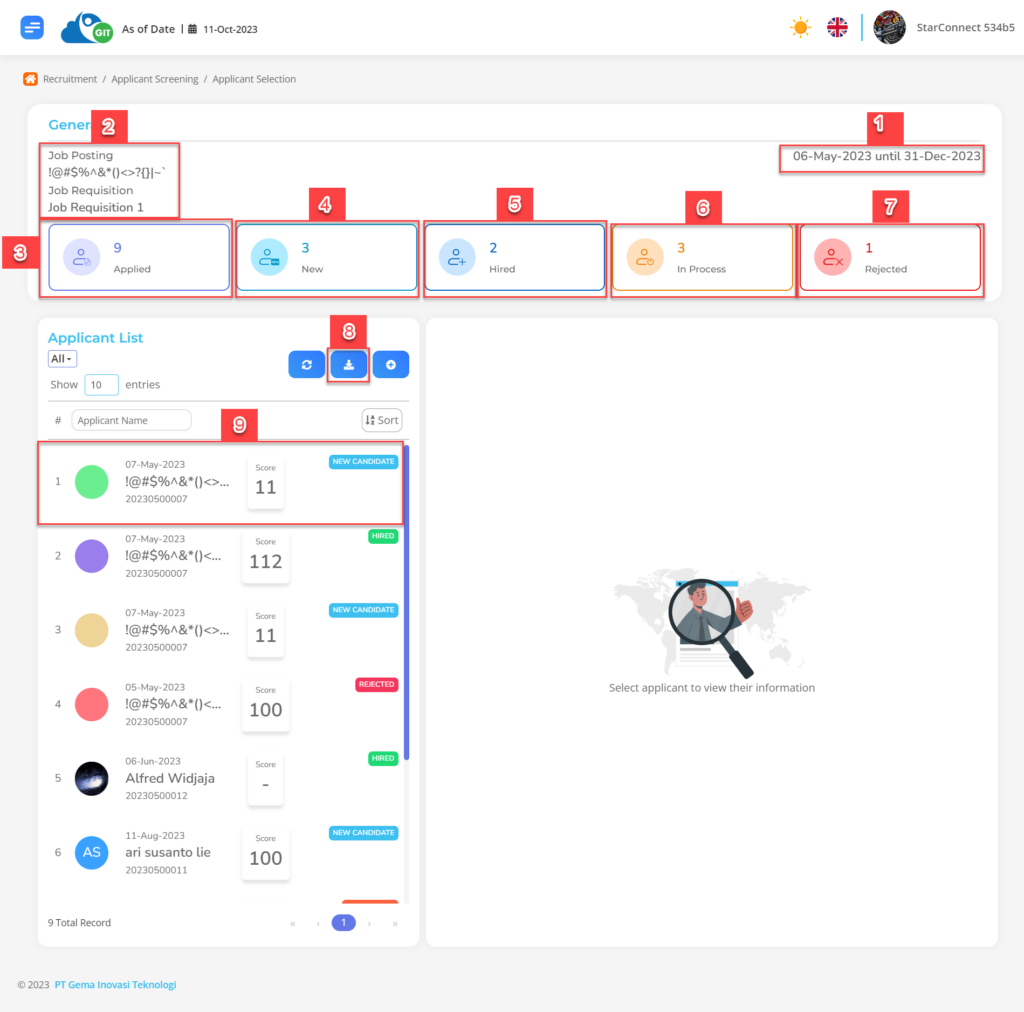
| No | Feature | Information |
| 1 | Date | Information on the date vacancies were opened and closed for acceptance |
| 2 | Job Posting | Detailed vacancy information posted. |
| 3 | Applied | Contains information about the number of applicants who registered for the vacancy. |
| 4 | New | Contains information on the number of applicants who have just registered for the vacancy. |
| 5 | Hired | Contains information on the number of applicants who have been accepted for the vacancy. |
| 6 | in process | Contains information on the number of applicants who are still in the recruitment process for that vacancy. |
| 7 | rejected | Contains information about applicants who were rejected for that vacancy. |
| 8 | download | Download the entire list of applicants who have registered for the vacancy along with their recruitment status. |
| 9 | list | Contains information on a list of applicants who have registered along with detailed information on their recruitment status. |
If you want to add applicant data that has been registered by the Admin, click button “+” on the Applicant list page
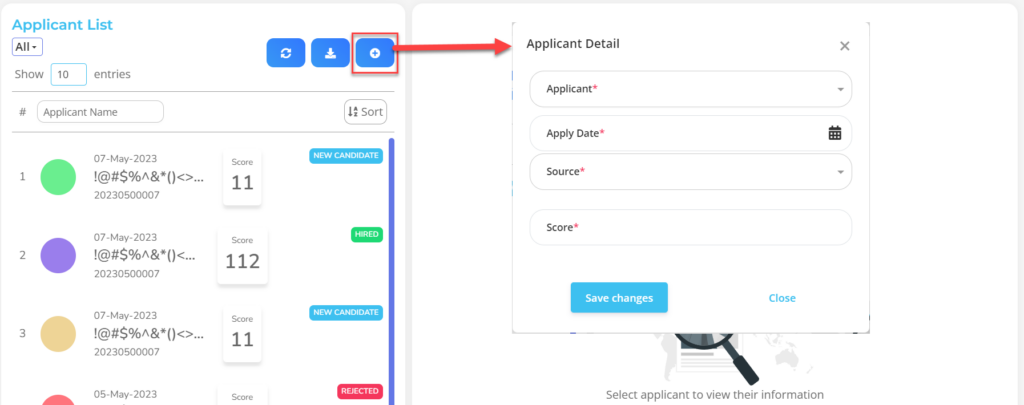
| No | Feature | Information |
| 1 | Applicant | Enter the name of the applicant who has been registered by the Admin in the job posting. |
| 2 | Apply Date | Enter the date the candidate applied for the job posting. |
| 3 | Source | Fill in the source of the candidate applying for the job post. |
| 4 | Score | Filled in the final assessment of applicants in the recruitment process. |
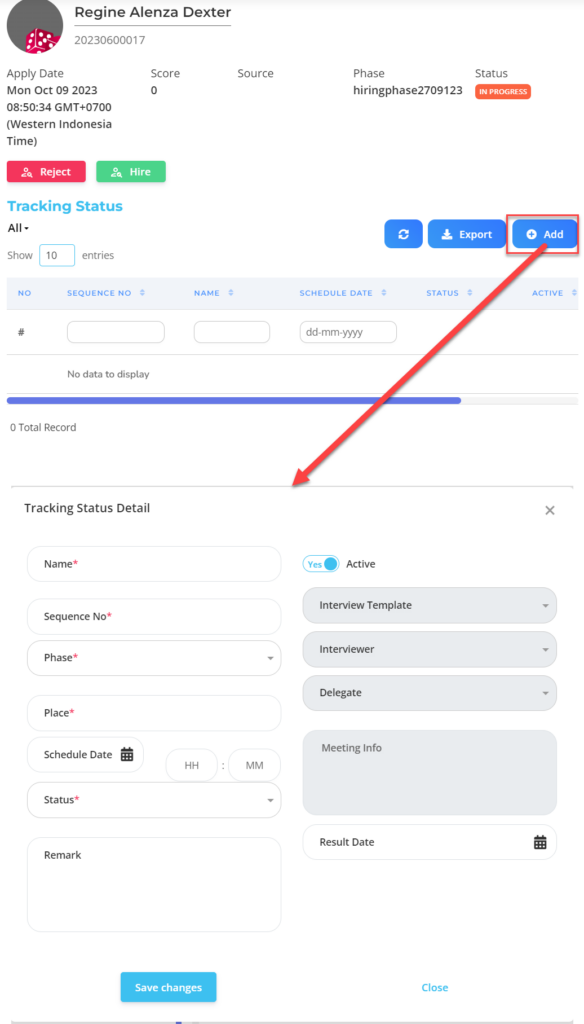
| No | Feature | Information |
| 1 | Name | Fill in the applicant's name information |
| 2 | Sequence No | Fill in the applicant number sequence information |
| 3 | Phase | Fill in the recruitment phase that the applicant is currently undertaking |
| 4 | Place | Fill in the applicant's recruitment location |
| 5 | Schedule Date | Fill in the date the recruitment process will be carried out |
| 6 | Status | Fill in the recruitment status information for the applicant |
| 7 | Remark | Filled in a note to the applicant |
| 8 | Active | • Click Yes, if the applicant is still active and processed in system. • Click No, if the applicant has not active. |
| 9 | Interview Template | Fill in information on the type of template that will be used for the interview |
| 10 | Interviewer | Fill in the name of the person who interviewed the applicant |
| 11 | Delegate | Fill in the name of the replacement interviewer if he is unable to attend the recruitment process |
| 12 | Meeting Info | Filled in information notes for the interview meeting |
| 13 | Result Date | Fill in the date of the interview results |
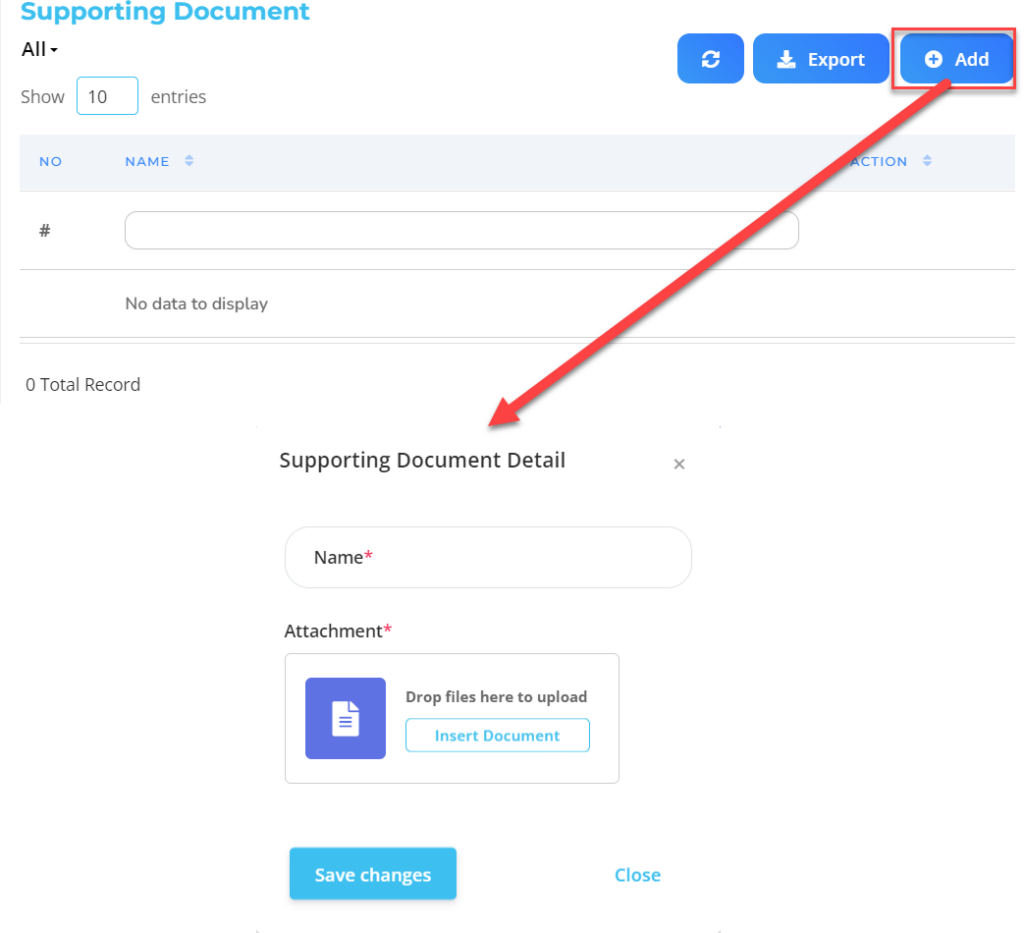
| No | Feature | Information |
| 1 | Name | Fill in the applicant's name |
| 2 | Attachment | select documentation for additional applicant details |
📝Notes Before you men-download results output, Make sure the section “Status” has changed to “Completed”.
Read Also :
– How to Create Questions for Assessing Prospective Employees
– How to Group Prospective Employee Questions
– How to Create a Prospective Employee Assessment Template
– How to Register Prospective Employee Recruitment Phases and Process
– How to Create a Job Vacancies Information Page