If you want create a new job, make sure Job Family has been created first, Creating a Job Family is useful as a grouping of jobs within system to make it easier for Admins to collect data.
In this section, You can learn :
1. How to create job groupings.
2. How to add jobs.
1. How to Create Job Groupings.
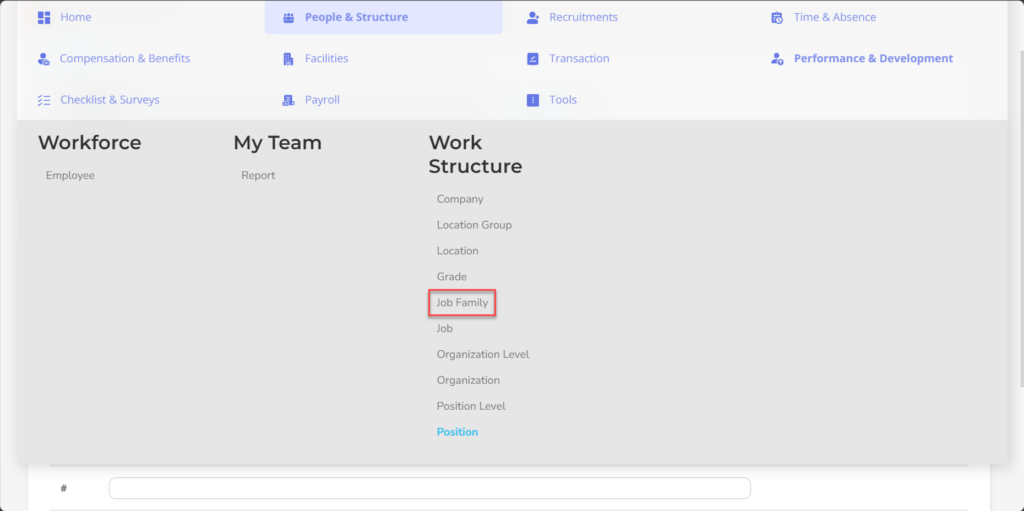
- On the Menu Work Structure → Select Job Family.
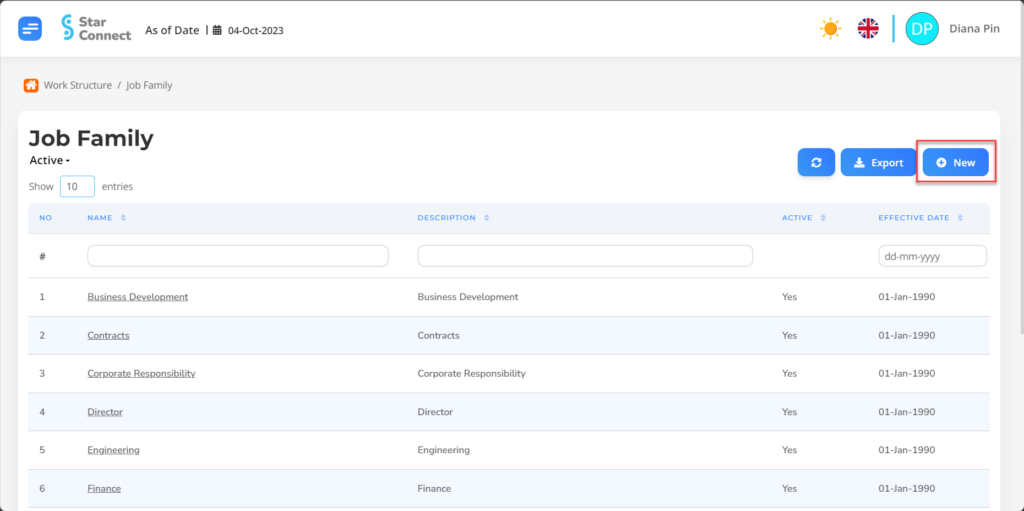
- Click the button New to register the company's Job Family.
- Fill in the section General with the Job Family you want to display.
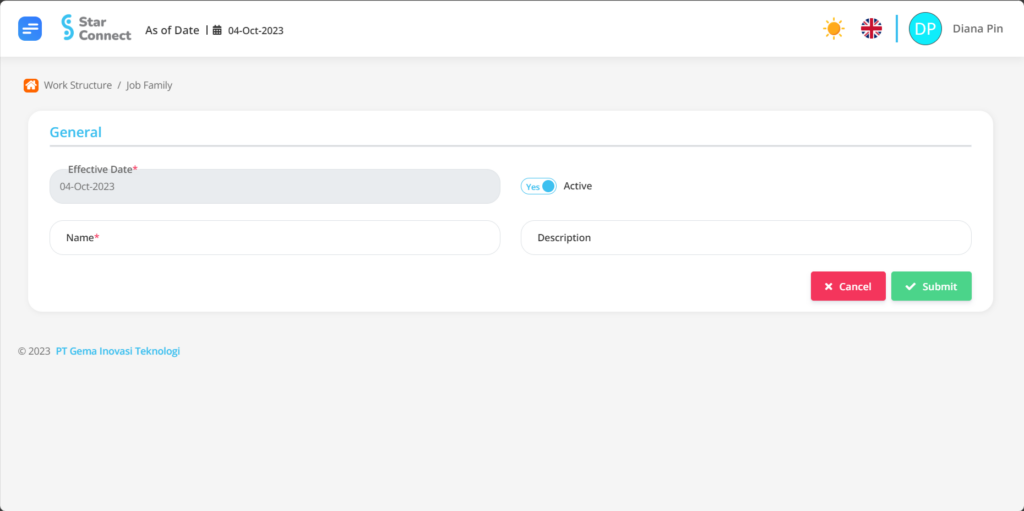
| No | Feature | Information |
| 1 | Effective Date | It will automatically be filled after input As of Date according to the effective date of the Job Family. |
| 2 | Name | Filled naming Job Family you wish to enroll into system, example: Director. |
| 3 | Active | • Click Yes, if the Job Family data is still active and processed in system. • Click No, if the employee's Job Family data is complete not active, then the Job Family data will automatically disappear in other menus. |
| 4 | Level | Enter Level Job Family that you want to create, example: Level Director. |
- If you have entered all the Company information, then the final step is to do it save with a click button “Submit” at the very bottom of the Job Family page.
2. How to Adding Jobs.
🔥IMPORTANT! Please note if you want to create a new job, make sure Job Family has been created first.
If Job Family has been created, You can proceed to the stage of creating a Job which is useful for registering positions / positions that will be associated with employees in more detail into system, the steps are as follows:
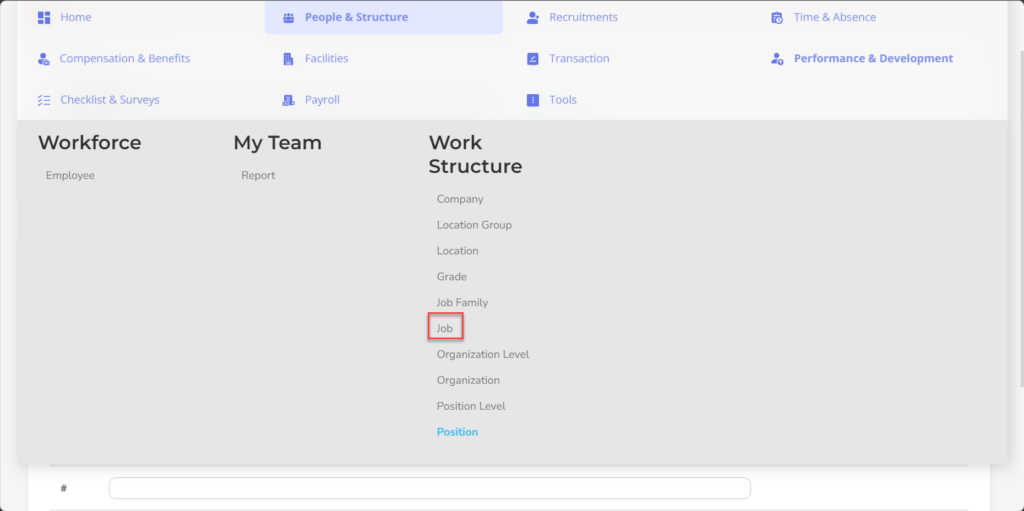
- On the Menu Work Structure → Select Job.
2. Click the button New to register a company Job.
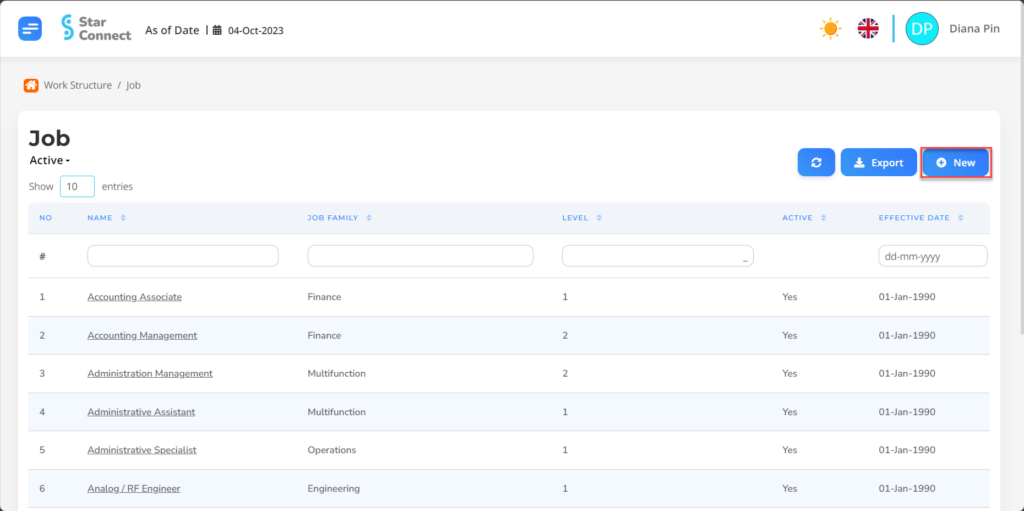
3. Fill in the section General with the Job you want to display.

| No | Feature | Information |
| 1 | Effective Date | It will automatically be filled after input As of Date according to the effective date of Job. |
| 2 | Name | Filled naming The job you want to register for system, example: Staff. |
| 3 | Level | Enter Level The job you want to create, example: Level 2. |
| 4 | Active | • Click Yes, if the Job data is still active and processed in system. • Click No, if the employee's job data is complete not active, then the Job data will be automatic lost in another menu. |
| 5 | Job Family | You need to group the jobs you want to list into Job Family which has been made previously, in the form of LOV. |
4. In part Valid Grade, choose Add then fill in the appropriate Grade Job, then click the button Save changes.
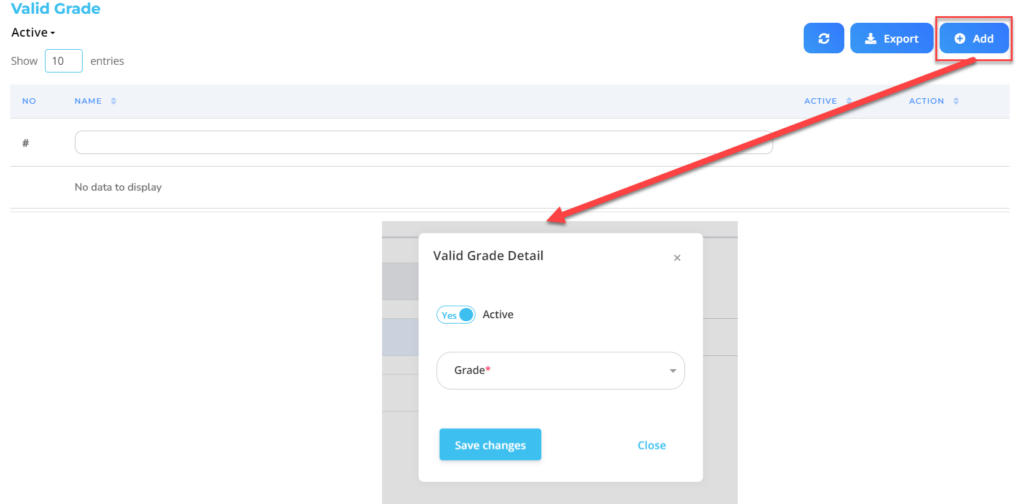
| No | Feature | Information |
| 1 | Active | • Click Yes, if the Valid Grade data is still valid active and processed in system. • Click No, if the data is Valid Grade not active, then the Valid Grade data will be automatic lost in another menu. |
| 2 | Grade | Fill with Grade/Group Level which only applies to the Job. |
5. In part Competencies, choose Add then fill in the Competencies accordingly Job, then click the button Save changes.
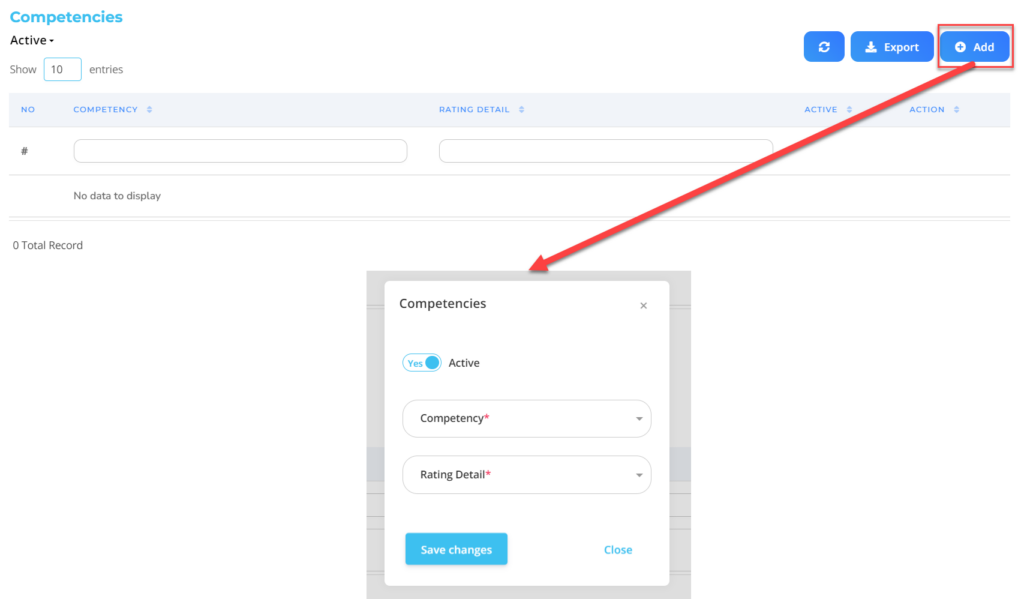
| No | Feature | Information |
| 1 | Active | • Click Yes, if the Competencies data is still there active and processed in system. • Click No, if the Competencies data is complete not active, then the Competencies data will be automatic lost in another menu. |
| 2 | Competency | Filled with competence what is required of the job, in the form of LOV. |
| 3 | Rating Detail | Filled with assessment level of the selected competencies, in the form of LOV. |
6. In part Education, choose Add then fill in the Education accordingly Job, then click the button Save changes.
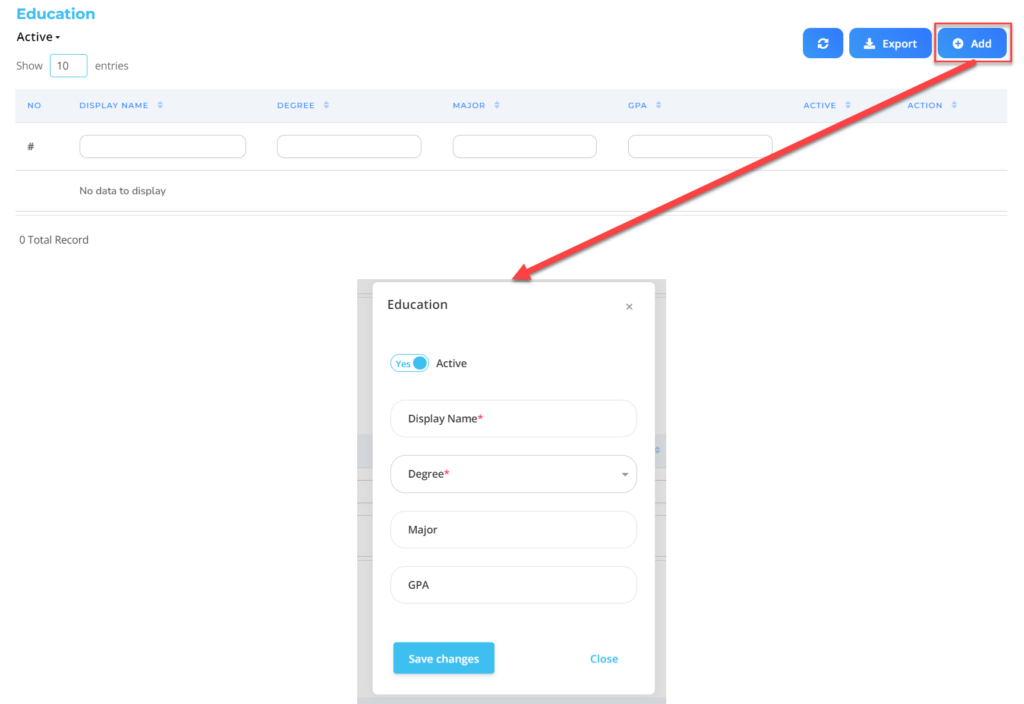
| No | Feature | Information |
| 1 | Active | • Click Yes, if the Education data is still active and processed in system. • Click No, if the Education data is complete not active, then the Education data will be automatic lost in another menu. |
| 2 | Degree | Filled with title of the employee's education, in the form of LOV. |
| 3 | Major | Filled with major of the employee's education. |
| 4 | GPA | Filled with value GPA from the education in question, with scale 0 until 4. |
7. In part Medicals, choose Add then fill in the Medicals accordingly Job, then click the button Save changes.
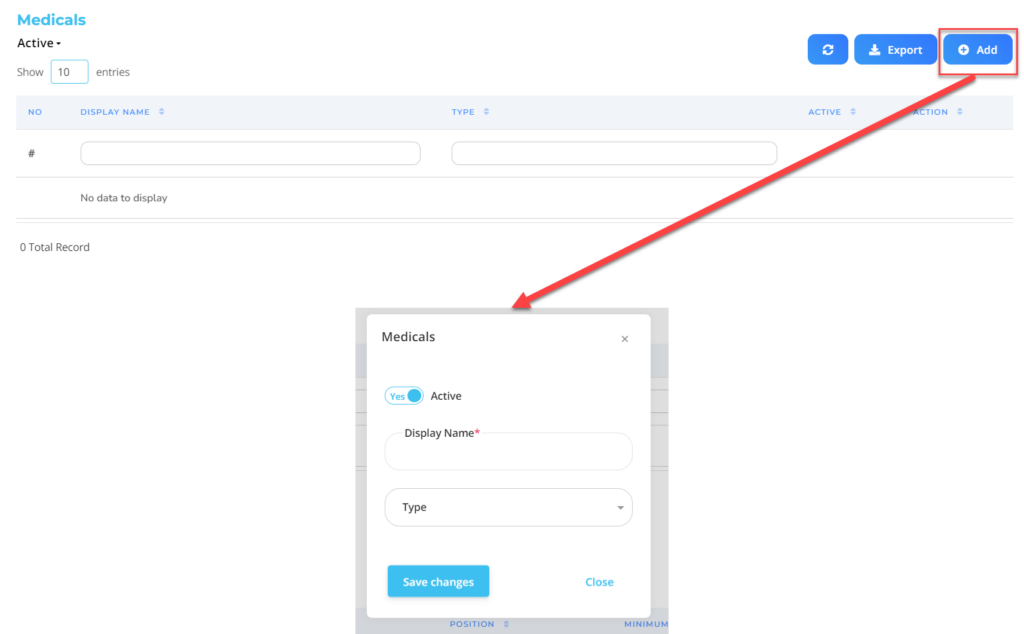
| No | Feature | Information |
| 1 | Active | • Click Yes, if the Medicals data is still active and processed in system. • Click No, if the Medicals data is already available not active, then the Medicals data will be automatic lost in another menu. |
| 2 | Display Name | Filled with display name for medical criteria that cannot be applied to this job, for example “Not Color Blind”. |
| 3 | Type | Filled with type of disease which cannot be applied to the Job, in the form of LOV. |
8. In part Medicals, choose Add then fill in the Medicals accordingly Job, then click the button Save changes.
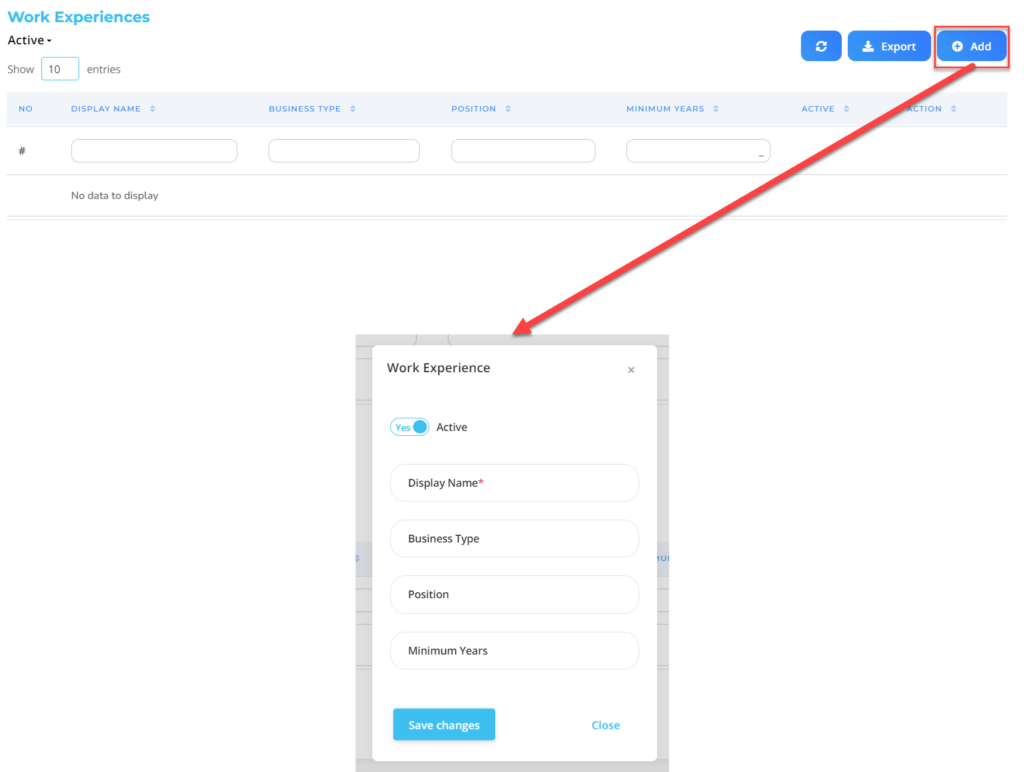
| No | Feature | Information |
| 1 | Active | • Click Yes, if the Work Experience data is still active and processed in system. • Click No, if the Work Experience data is available not active, then the Work Experience data will be automatic lost in another menu. |
| 2 | Business Type | Filled with experience field of work which are the criteria for the job in question. |
| 3 | Position | Filled with experience job position which was once occupied. |
| 4 | Minimum Years | Filled with provisions minimum term of year work experience in the field of work and/or position concerned. |
9. If you have entered all the Job information, then the final step is to do it save with a click button “Submit” at the very bottom of the Jobs page.
Read Also :
– How to Add a Company
– How to Add a Company Location
– How to Create a Company Grade
– How to Add an Organization to a Company
– How to Add Employee Position Levels