If you want Registering expenses from a project into system, You must Make a type of expenses grouping said first.
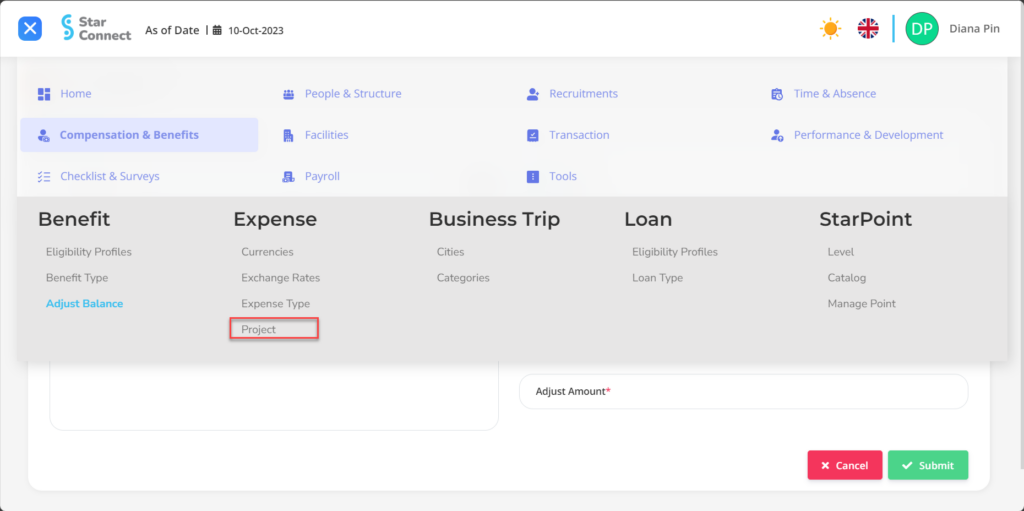
Registration type of expenditure grouping can be made with Expense Type On the Expense menu, and registration of expenditure fees from a project can be made with Project On the Expense menu.
In this section, You can learn :
1. How to make an expense type.
2. How to make a project.
1. How to Membuat Expense Type.
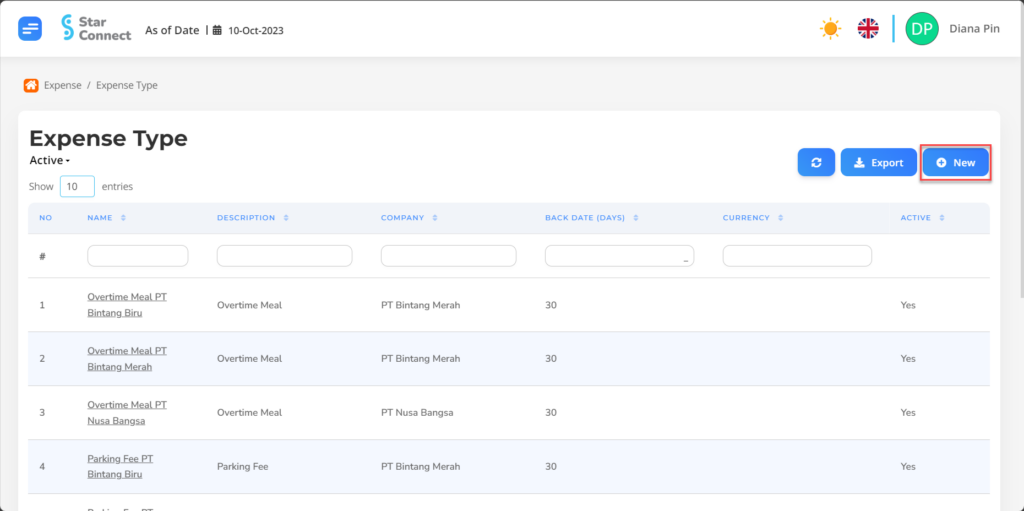
- On the Menu Expense → Select Expense Type.
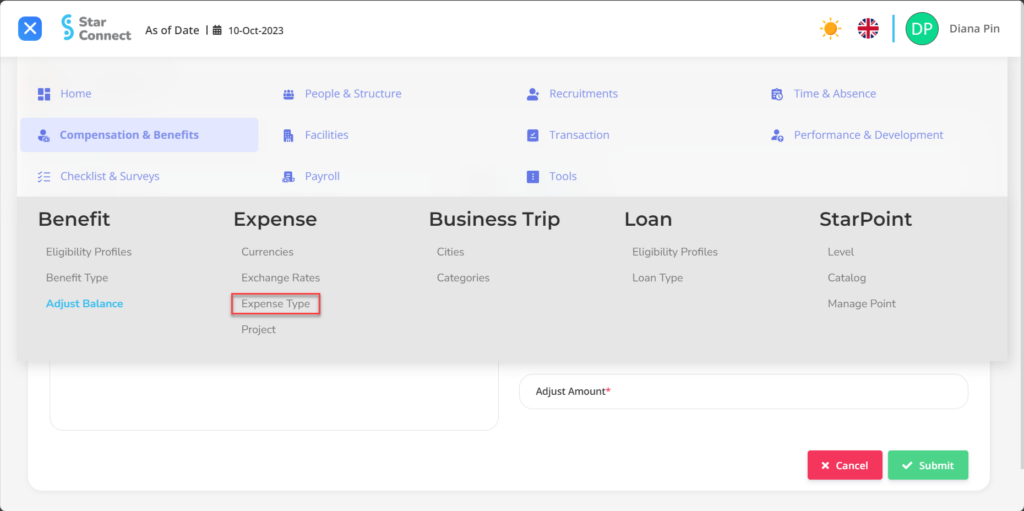
- Click the button New To register Expense Type on the Benefit menu.
- In part General, isi with the type of expense type you want to display.
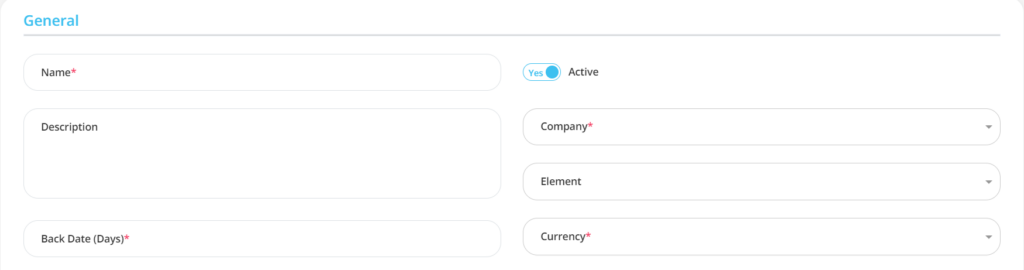
| No | Feature | Information |
| 1 | Name | Filled with no tipe Expense. |
| 2 | Description | Filled with description tipe Expense. |
| 3 | Company | Filled with company that will be included in that type of expense, in the form of LOV. |
| 4 | Active | • Click Yes, If the type of expense type is still active and processed in system. • Click No, If the type of expense type has been not active, then the type of expense type will be automatic lost in another menu. |
| 5 | Back Date (Days) | Filled with provisions back limit Employees can submit this type of expense. |
| 6 | Element | Filled with element which will be used into the type of expense for the process payroll, in the form of LOV. |
| 7 | Currency | Filled with currencies that will be used into the type of expense |
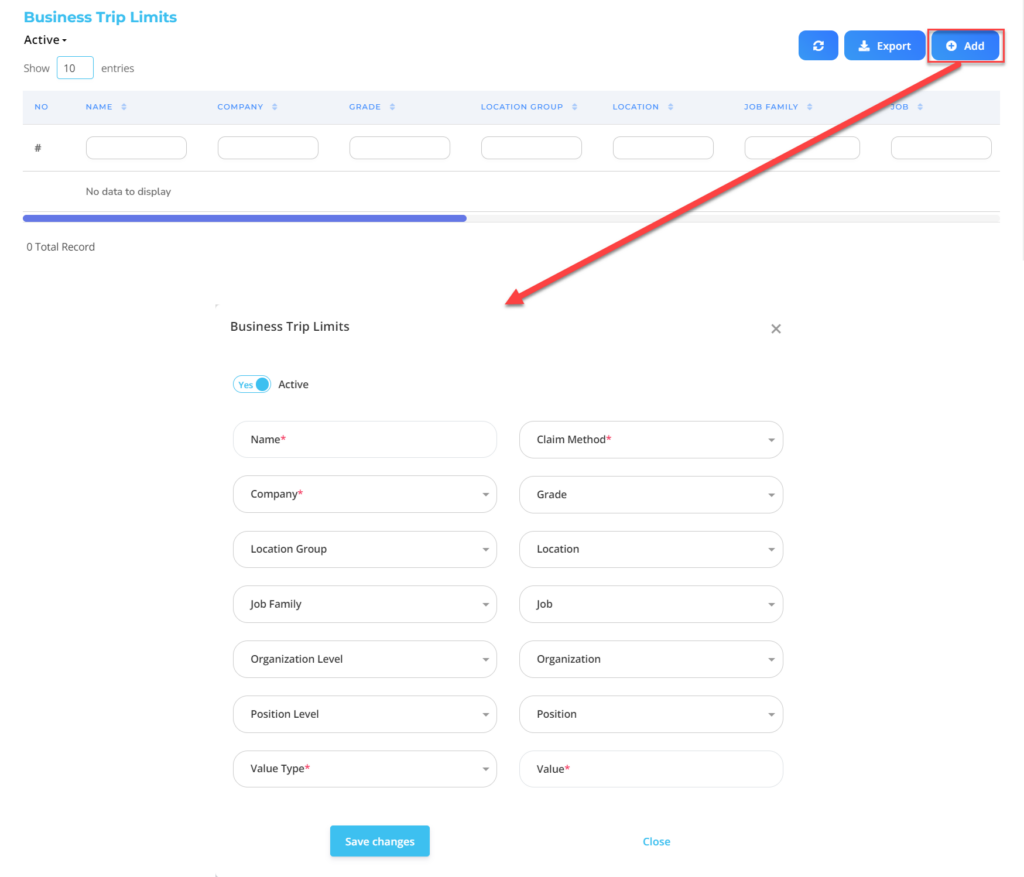
In part Business Trip Limits, click the button “Add”, and continue by filling in the data grouping data that will take part in the project
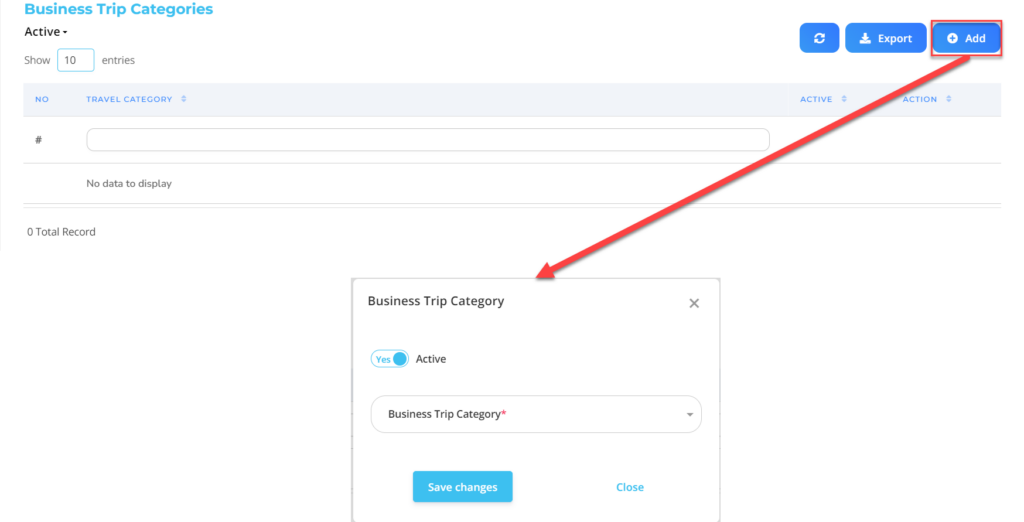
| No | Feature | Information |
| 1 | Active | • Click Yes, If the details of the expenditure are still active and processed in system. • Click No, If the details of the expenditure have been not active, then the expenditure details will be automatic lost in another menu. |
| 2 | Business Trip Category | Filled with which type of category trip will be run. |
In part Business Trip Limits, click the button “Add”, and continue by filling in the data grouping data that will take part in the project
- If you have entered all the Expense Type information, then the final step is to do it save with a click button “Submit” At the bottom of the Expense type page.
| No | Feature | Information |
| 1 | Active | • Click Yes, If the Eligibility Profile details for the benefit are still active and processed in system. • Click No, If the Eligibility Profile details for benefits already not active, then the Eligibility Profile Detail Data for Benefit will be automatic lost in another menu. |
| 2 | Name | Filled no Businies Trip to be run. |
| 3 | Company | Filled with details Company that will be included in the Trip Business, in the form of LOV. |
| 4 | Location Group | Filled with details Location Group that will be included in the Trip Business, in the form of LOV. |
| 5 | Job Family | Filled with details Job Family that will be included in the Trip Business, in the form of LOV. |
| 6 | Organization Level | Filled with details Organization Level that will be included in the Trip Business, in the form of LOV. |
| 7 | Position Level | Filled with details Position Level that will be included in the Trip Business, in the form of LOV. |
| 8 | Value Type | Filled with details Value Type that will be included in the Trip Business, in the form of LOV. |
| 9 | Claim Method | Filled with details Claim Method that will be included in the Trip Business, in the form of LOV |
| 10 | Grade | Filled with details Grade that will be included in the Trip Business, in the form of LOV. |
| 11 | Location | Filled with details Location that will be included in the Trip Business, in the form of LOV |
| 12 | Job | Filled with details Job that will be included in the Trip Business, in the form of LOV. |
| 13 | Organization | Filled with details Organization that will be included in the Trip Business, in the form of LOV. |
| 14 | Position | Filled with details Position that will be included in the Trip Business, in the form of LOV. |
| 15 | Value | Filled with value that will be obtained from the business trip that is run |
2. How to Make a project.
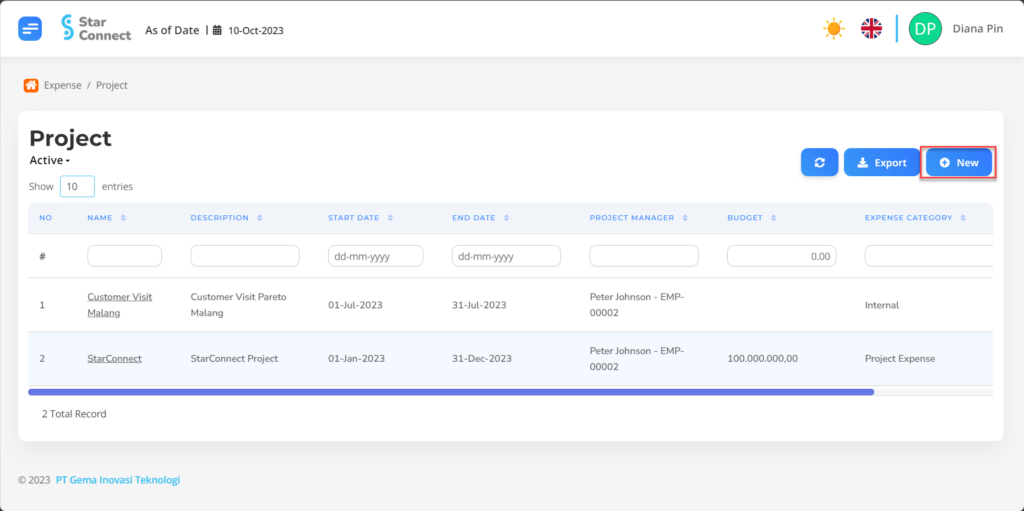
- On the Menu Expense→ Select Project.
- Click the button New To enroll Project.
- In part General, isi with the type of project you want to display.
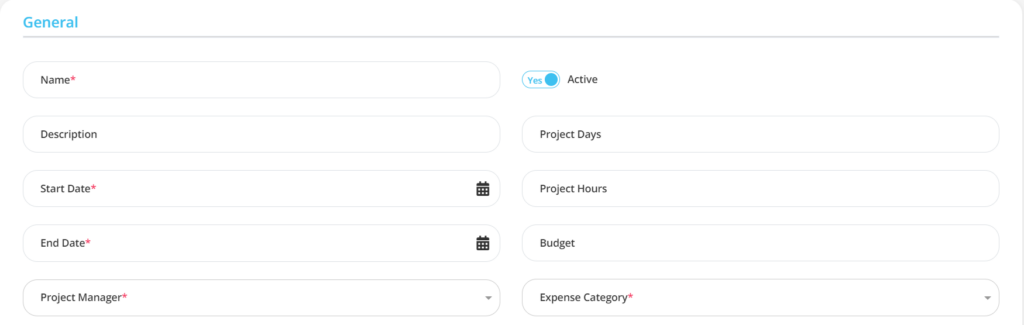
| No | Feature | Information |
| 1 | Name | Filled with no Project. |
| 2 | Description | Filled with description Project. |
| 3 | Start Date | Its start Project. |
| 4 | End Date | The end date Project. |
| 5 | Project Manager | Filled by who will handle the entire project. |
| 6 | Active | • Click Yes, If the type of project is still active and processed in system. • Click No, If the type of project has been not active, then the type of project will be automatic lost in another menu. |
| 7 | Project Days | Total days Project will be done. |
| 8 | Project Hours | Total hours Project will be done. |
| 9 | Budget | Filled nominal budget that will be used in Project. |
| 10 | Expense Category | Filled with kategori Expense which the company will use for the project. |
- In part Member, click the button “Add”, and continue by filling in the data grouping data that will take part in the project.
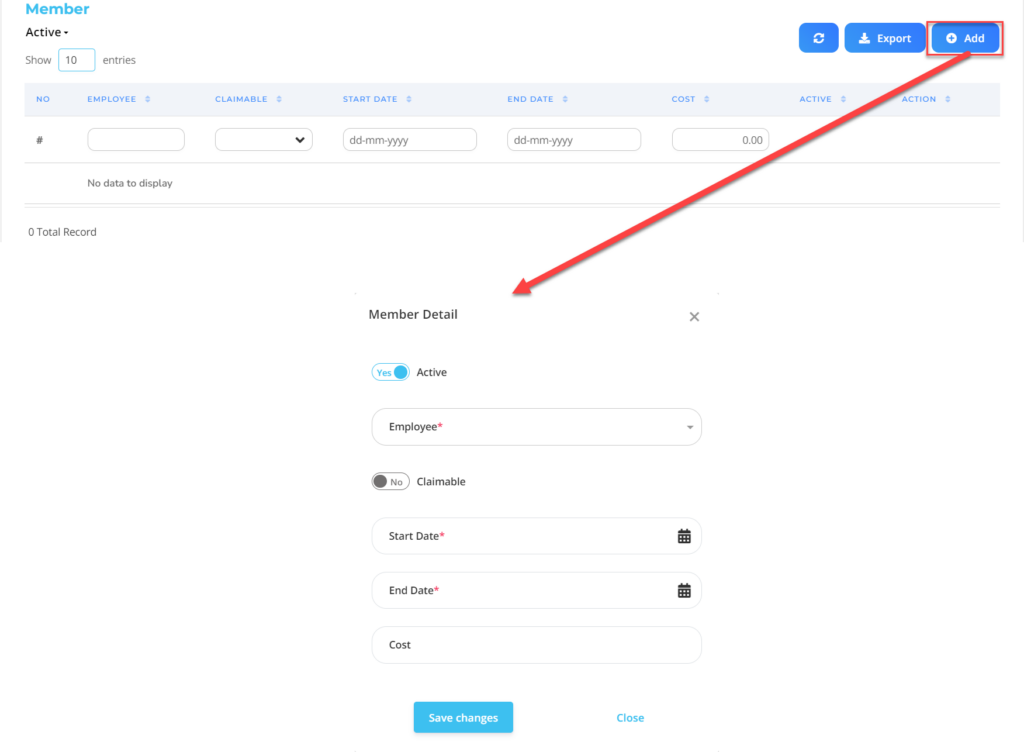
| No | Feature | Information |
| 1 | Active | • Click Yes, if the employee is still active In Project and in the process at system. • Click No, If the type of employee has been not active In Project, then the employee will be automatic lost in another menu. |
| 2 | Employee | Filled with employee name who followed Andil in Project. |
| 3 | Claimable | Diisi Jika Cost Project can be claimed for employees. |
| 4 | Start Date | Filled start date employees are involved in the project. |
| 5 | End Date | Filled end date employees are involved in the project. |
| 6 | Cost | Filled nominal what employees get in the project. |
Do save with a click button “Save Changes” In each part first, Then continue by filling in the completeness of other project data.
- In part Expense, click the button “Add”, and continue by filling in the details of the expense data that will be used for the project.
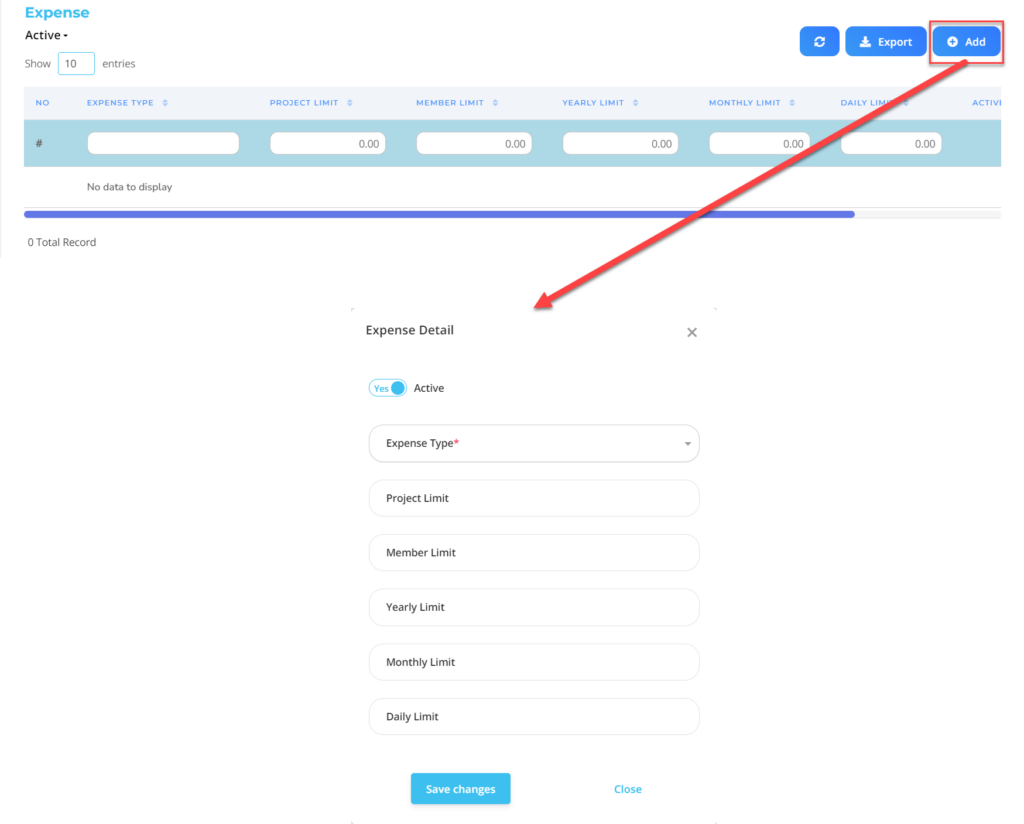
| No | Feature | Information |
| 1 | Active | • Click Yes, If the details of the expenditure are still active and processed in system. • Click No, If the details of the expenditure have been not active, then the expenditure details will be automatic lost in another menu. |
| 2 | Expense Type | Filled with tipe Expense that will be used for project.. |
| 3 | Project Limit | Filled batas limit Project that will be used appropriate Expense, example: 100.000, then the project has a maximum usage limit 100.000 from the expense. |
| 4 | Member Limit | Filled limit of the number of employees who followed Andil in Project. example: 3, then the project has only a limit 3 Employees who are included. |
| 5 | Yearly Limit | Filled Annual limit limit Project is running. example: 3, then the project has a maximum limit of running only 3 year. |
| 6 | Monthly Limit | Filled Monthly limit limit Project is running. example: 3, then the project has a maximum limit of running only 3 month. |
| 7 | Daily Limit | Filled daily limit limit Project is running. example: 365, then the project has a maximum limit of running only 365 day. |
Do save with a click button “Save Changes” In each part first, Then continue by filling in the completeness of other project data.
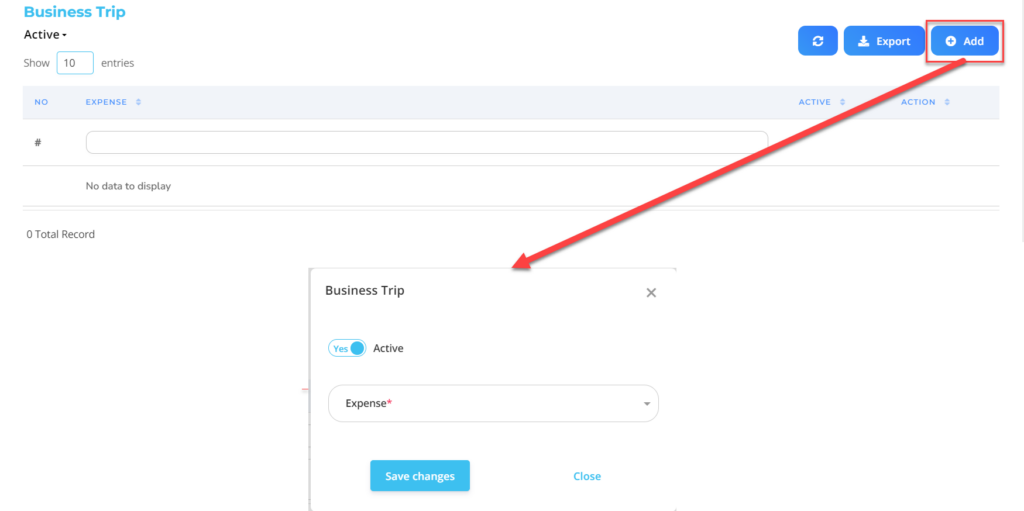
| No | Feature | Information |
| 1 | Active | • Click Yes, If the details of the expenditure are still active and processed in system. • Click No, If the details of the expenditure have been not active, then the expenditure details will be automatic lost in another menu. |
| 2 | Expense | Filled with Expense that will be used for Project. |
- If you have entered all project information, then the final step is to do it save with a click button “Submit” At the bottom of the project page.
Read Also :
– How to Manage Benefits
– How to Register Loan Types
– How to Register Company Asset Types
– How to Register a Workspace Type
– A Glance at the Transaction Menu