If you want register the type of absence Employees inside system, You must create employee grouping types based on absence type said first.
Registration of types of employee grouping based on absence type can be made using Eligibility Profiles on the Absence Menu, and registration of employee absence types can be made using Absence Type on the Absence Menu.
In this section, You can learn :
1. How to make an eligibility profiles.
2. How to create an Absence Type.
1. How to Create Eligibility Profiles.
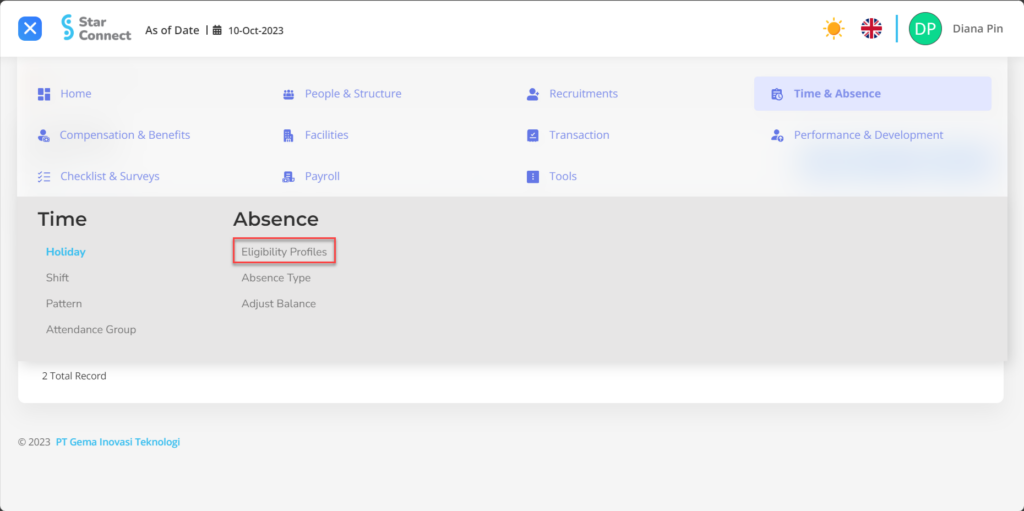
- On the Menu Absence → Select Eligibility Profiles.
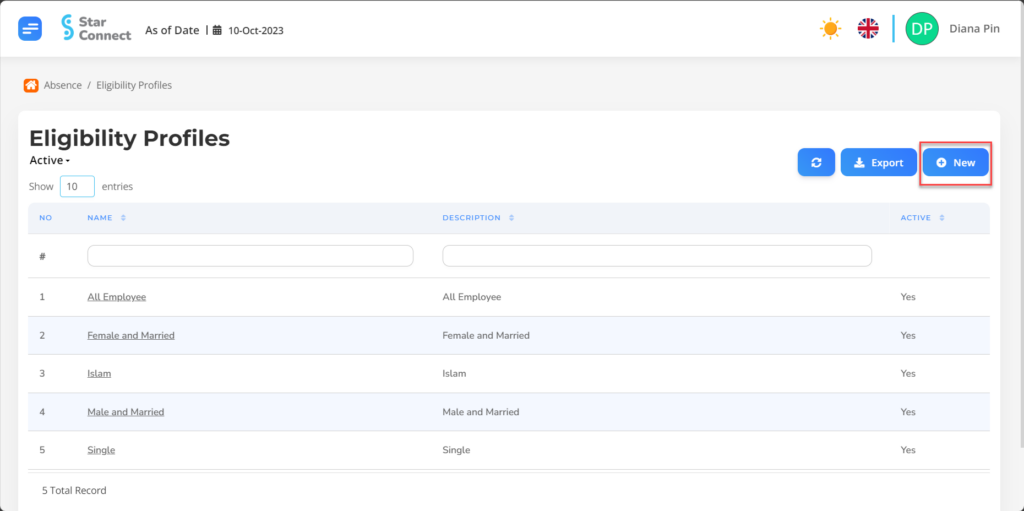
- Click the button New to register Eligibility Profiles in the Absence menu.
- In part General, isi with the type of Eligibility Profiles you want to display.

| No | Feature | Information |
| 1 | Name | Filled with no Eligibility Profiles. |
| 2 | Description | Filled with description Eligibility Profiles. |
| 3 | Active | • Click Yes, if the Eligibility Profiles type is still active and processed in system. • Click No, if the Eligibility Profiles type is already in place not active, then the Eligibility Profiles type will be automatic lost in another menu. |
- In part Criteria, click the button “Create”, and continue by filling in the employee criteria for determining the type of absence.
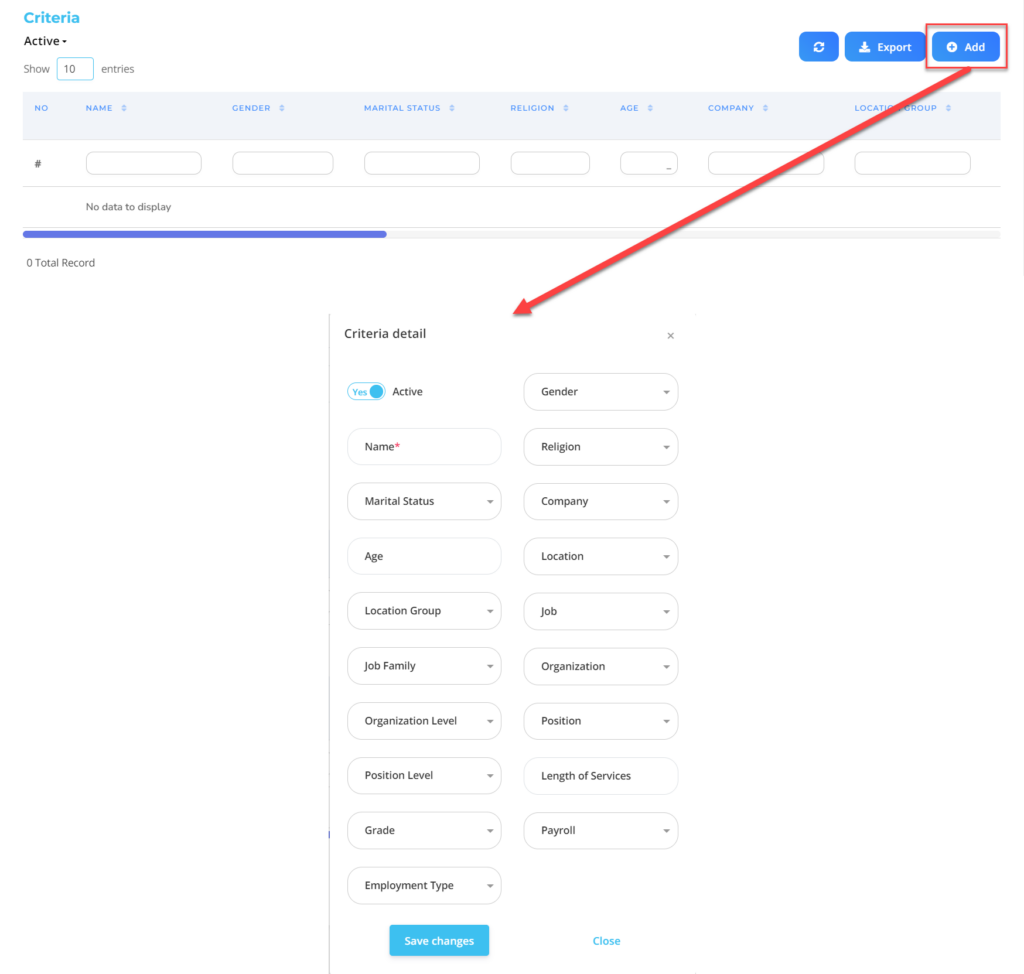
| No | Feature | Information |
| 1 | Active | • Click Yes, if the Eligibility Profile details for the Absence are still active and processed in system. • Click No, if the Eligibility Profile details for Absence are complete not active, then the detailed Eligibility Profile data for Absence will be automatic lost in another menu. |
| 2 | Name | Filled no Eligibility Profile for employee absenteeism. |
| 3 | Marital Status | Filled with details marital status which will be included in the Eligibility Profile. |
| 4 | Age | Filled with details age which will be included in the Eligibility Profile. |
| 5 | Location Group | Filled with details Location Group which will be included in the Eligibility Profile, in the form of LOV. |
| 6 | Job Family | Filled with details Job Family which will be included in the Eligibility Profile, in the form of LOV. |
| 7 | Organization Level | Filled with details Organization Level which will be included in the Eligibility Profile, in the form of LOV. |
| 8 | Position Level | Filled with details Position Level which will be included in the Eligibility Profile, in the form of LOV. |
| 9 | Grade | Filled with details Grade which will be included in the Eligibility Profile, in the form of LOV. |
| 10 | Employment Type | Filled with details Employment Type which will be included in the Eligibility Profile, in the form of LOV. |
| 11 | Gender | Filled with details gender which will be included in the Eligibility Profile, in the form of LOV. |
| 12 | Religion | Filled with details religion which will be included in the Eligibility Profile, in the form of LOV. |
| 13 | Company | Filled with details Company which will be included in the Eligibility Profile, in the form of LOV. |
| 14 | Location | Filled with details Location which will be included in the Eligibility Profile, in the form of LOV. |
| 15 | Job | Filled with details Job which will be included in the Eligibility Profile, in the form of LOV. |
| 16 | Organization | Filled with details Organization which will be included in the Eligibility Profile, in the form of LOV. |
| 17 | Position | Filled with details Position which will be included in the Eligibility Profile, in the form of LOV. |
| 18 | Length of Services | Filled with details minimum working hours Eligible employees are included in the Eligibility Profile, in the form of LOV. |
| 19 | Payroll | Filled with details Payroll which will be included in the Eligibility Profile, in the form of LOV. |
Do save with a click button “Save Changes” in the criteria section first, then continue by filling in the other complete Eligibility Profiles data.
- If you have entered all the Eligibility Profiles information, then the final step is to do it save with a click button “Submit” at the very bottom of the Eligibility Profiles page.
2. How to Create an Absence Type.
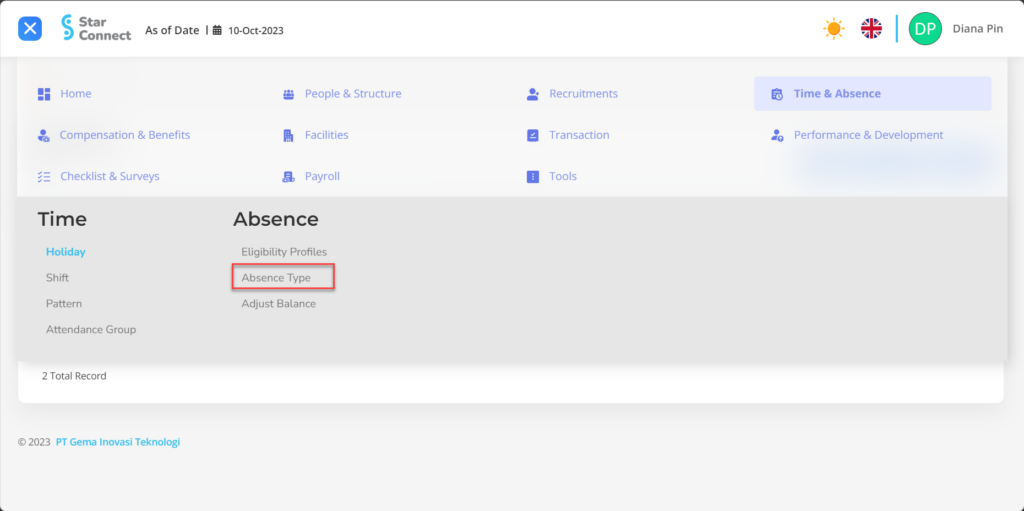
- On the Menu Absence → Select Absence Type.
- Click the button New to register the Absence Type.
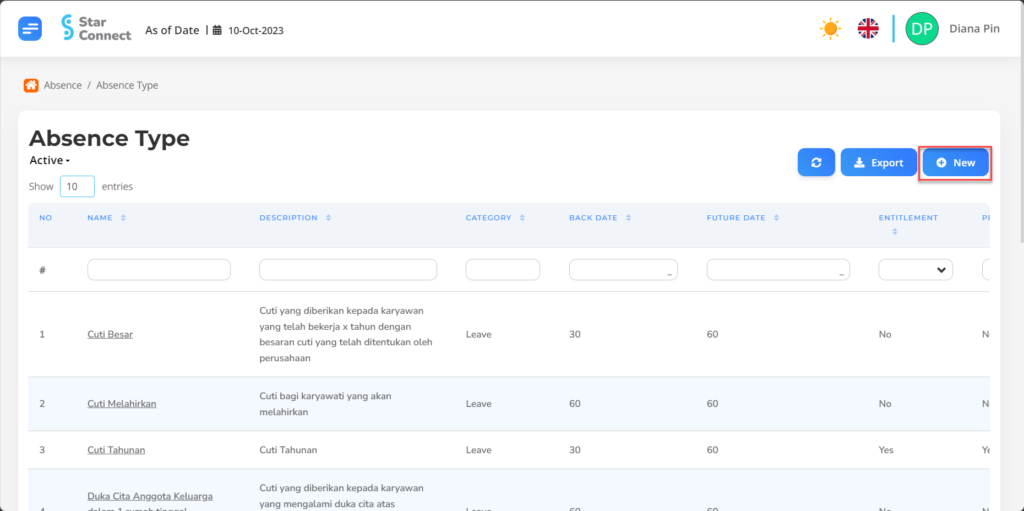
- In part General, isi with the type of Absence Type you want to display.
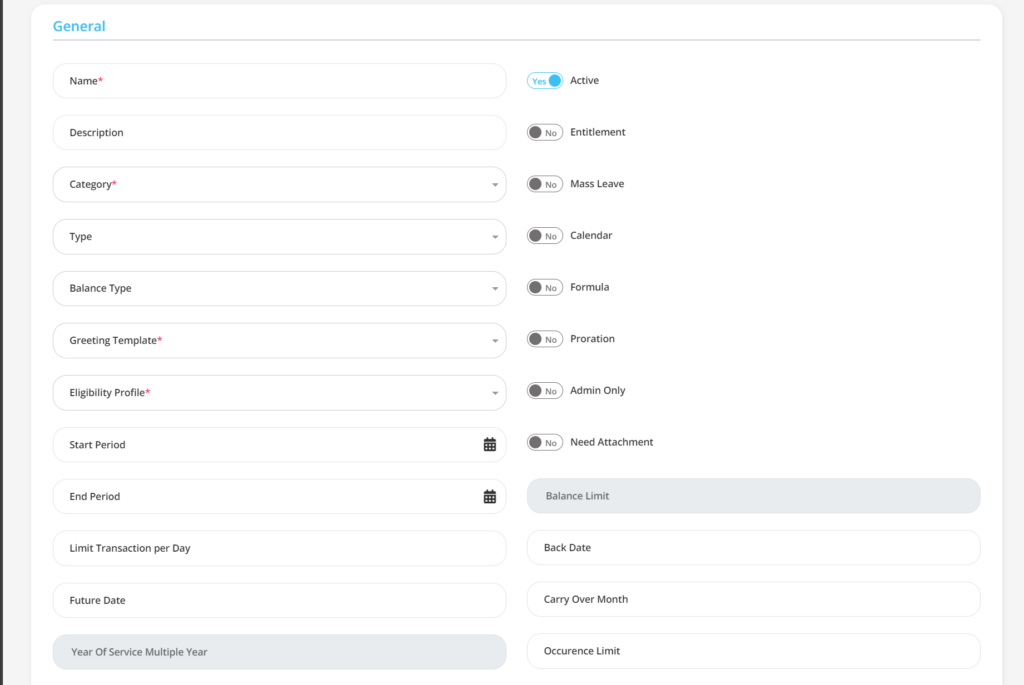
| No | Feature | Information |
| 1 | Name | Filled with no absent type. |
| 2 | Description | Filled with description absent type. |
| 3 | Category | Filled with category absent type, example: Sick, Permission, and others. |
| 4 | Type | Filled with type roll call, example: Annual Leave, Maternity Leave, and others. |
| 5 | Balance Type | Filled with the rest of the time roll call, example: Monthly (then the employee will get 1 the right to be absent every month). |
| 6 | Greeting Template | Filled in by selecting tipe Greeting Templates that have been created are based on the type of absence. |
| 7 | Eligibility Profile | Filled with groupings Eligibility Profile employees who will have the right to be absent. |
| 8 | Start Period | Early start This absence can be used annually. |
| 9 | End Period | Deadline This absence can be used annually. |
| 10 | Limit Transaction Per Day | Usage limits Absence rights based on period of absence, example: 5, then employees only have the right to be absent 5 days in that period. |
| 11 | Future Date | Filled with provisions day limit Employees can submit absences before the absence is used. |
| 12 | YOS Multiple Year | Will be given special and multiple absence rights if the employee's working time exceeds the standard based on the Hire Date, example: 5, then every 5 employees will receive special absence rights and multiples apply. |
| 13 | Active | • Click Yes, if the type of absence is still there active and processed in system. • Click No, if this type of absence has occurred not active, then the type of absence will be automatic lost in another menu. |
| 14 | Entitlement | • Click Yes, if the absence type is: total balance absent that per period or annually. • Click No, if type is absent No form total balance absent that per period or annually. |
| 15 | Mass Leave | • Click Yes, if absence type is included shared employee absences. • Click No, if type is absent No including shared employee absences. |
| 16 | Calendar | • Click Yes, if type is absent calculated based on calendar date, not work date. • Click No, if the absence type is not calculated based on calendar date, but work date. |
| 17 | Proration | • Click Yes, if type is absent customized Hire Date employees in that year. Example: Employees hired in February, then the right to be absent is 11 in that year. • Click No, if the absence type is adjusted not based on Hire Date employees in that year. |
| 18 | Admin Only | • Click Yes, if the absence type can only be accessed/submitted by admin, not by the employees themselves, example: Hajj holiday. • Click No, if the absence type can be accessed/submitted by all users. |
| 19 | Need Attachment | • Click Yes, if type is absent necessary attach proof of reason submit an absence. • Click No, if type is absent not necessary attach proof of reason submit an absence. |
| 20 | Balance Limit | Limits use of the right to be absent during that period. |
| 21 | Back Date | Filled with provisions day limit employees can submit an absence after absence of use. |
| 22 | Carry Over Month | Filled the initial limit starts the absence can be used, example: 3, then the absence can start to be used in the next month 3. |
| 23 | Occurrence Limit | Application deadline roll call per period, example: 1, then this type of absence can only be submitted 1 times during the employee's employment period. |
- In part Additional Balance, choose Add then continue by filling in additional absence data which will be determined based on the employee's length of service.
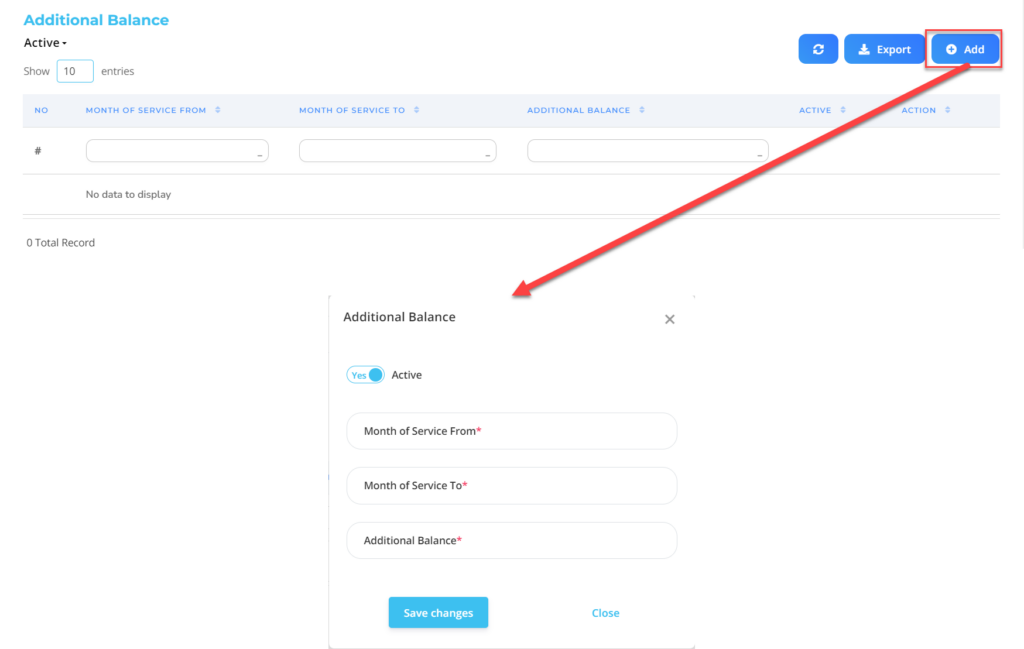
| No | Feature | Information |
| 1 | Active | • Click Yes, if the type of absence is still there active and processed in system. • Click No, if this type of absence has occurred not active, then the type of absence will be automatic lost in another menu. |
| 2 | Month of Service From | Filled with minimum start of the employee's term of employment who will get special absence rights based on Hire Date, example: 5, then if the employee's work period is over 5 month then you will get special absence rights. |
| 3 | Month of Service To | Filled with the end of the employee's employment period who will get special absence rights based on Hire Date. |
| 4 | Additional Balance | Additional absence rights on that particular type of absence. |
Do save with a click button “Save Changes” In each part first, then continue by filling in other complete Absence Type data.
- If you have entered all the Absence Type information, then the final step is to do it save with a click button “Submit” at the very bottom of the Absence Type page.
Read Also :
– How to Grant Special Absence Rights